Sunday, May 27, 2012
Distress Inks Rock
I bought new acid free art materials this week which I'm kinda digging. They are water-based stamp pads called Distress Inks by Tim Holtz that can be applied to paper, wood, and even photographs. Typically you would use a paper tortillian to accent certain areas of photos to age and weather them, but I used the stamp pad raw and punched and dragged the square pads throughout the paper directly. It created a great abstract effect that I know I could use in future projects.


Tuesday, May 22, 2012
Early Bird Gets to Wait in His Car and Draw
I had work an hour earlier than normal on Thursday but it was the wrong Thursday. Although I live only five minutes away, I decided to just draw instead and came up with this pretty cool abstract. No harm, no foul.. Just art. 
Friday, January 20, 2012
Keep that jingle jangle jingle
This series came together in lieu of the bi-annual "Penny Sale" at my job. I started with President Lincoln who's face was plastered all over everything. I was staring at him at work all day for a whole month so what's a few more hours right? It blew up into a full blown series containing all presidents and important figures in our country's history that are immortalized on US currency. I finished it with Obama as a snake which I titled Red Across America to make fun of his proposed health care system. He's such a snake and he looks good in his true form. I'm just sour because I honestly thought this time was going to be different. Everything he said he would do during the last election sounded so good.. I wish it all.. well most of it.. were true.
The slogan of his campaign was "CHANGE," and not the literal form that most Americans contain in their pockets, but the promise of a new direction for the country. The most obvious "change" was racial and at this point it seems that that is all it was. The bail outs, the war for oil.. It all persists.
This series is to help people "change" for real. To aid change in minds stuck in their ways as my figurative finger points at all these suits smiling and waving on on TVs as they collapse their fingers back and forth at night to accompany their sinister laughs.
The times have changed my friends. We don't duel in the street in response to being "Yella!" We don't dip our feathers in ink and mail shit on horses.. Let's get with the program here and demand this change.
We all have a voice.. Scratch that! We all have many voices now. Social networking has become the new water coolers for our society and people need to start drinking. Bill may still be raving about Gloria Notimportant on American Idol somewhere but there are 15,000 others Bills talking about shit that actually matters. Let's stand back and send back the free bullshit our government propagandizes as "Top Headlines" and tap the keg on true political and environmental change.. Do you think our old ass system is working?
Anyway, there is a lot to say about each piece individually but now I'm pissed off and totally over this..
Pangea fo life!


Thursday, January 19, 2012
Making Dreams Come True
This acrylic painting was commissioned by a coworker for her grandmother. Her grandmother always loved this particular painting and she tried for many years to have someone hand paint this image. Unfortunately for her she could not find anyone to tackle the task. Fortunately for me, I'm a artist. A struggling artist willing to 'portrait' some pooh if the money's right.
My coworker told me about this project in October and she brought me a postcard of the image for a reference that she took from
Her grandmother. I snapped a shot of it with my iPhone which became the only image I had or could find since I did not know the artist's name.
I started the reproduction that night and spent a couple hours painting the larger areas in the background and never touched it again until a week prior to Christmas. I procrastinated this piece for some time.
On a side note, I procrastinate everything actually but in a good way. I seem to like the pressure of deadlines and push the envelope of those deadlines to the last possible opportunity. When i was in college, I noticed my best works were the ones where I was up all the entire night/morning before class or when i was forced into production.
This was a similar situation. I literally finished this painting twenty minutes before I gave it to my friend. It was so fresh I couldn't even varnish it..
To end this story, the gift was a huge success. My friend loved the final product and it sounded like her grandma did too. She later told me that her grams loved the painting so much that it made her cry. I'm not in the business of making anyone cry, but hearing that made me feel good and I was happy to to be involved.
I'm glad she liked it Steph and you're welcome Steph's grandma ;)
Reignite That Candle
I love sales. C'mon! Who doesn't? You hear things like 40% off and see beautifully designed signs urging you to spree like there will never be a sale again. You go overboard and purchase things you may never need or even want.. use? You get home. You sort of regret it but you're still happy because you saved a couple bucks.
That's me right now. I spent a grip but I saved more than I spent. I recently went insane and bought a couple hundred dollars worth of supplies just because. They were my Christmas gifts to myself. Canvas, markers, pens, frames, clay.. You name it, I got it. Here is the fruit of those spoils..

That's me right now. I spent a grip but I saved more than I spent. I recently went insane and bought a couple hundred dollars worth of supplies just because. They were my Christmas gifts to myself. Canvas, markers, pens, frames, clay.. You name it, I got it. Here is the fruit of those spoils..
Draw Me Crazy
This is another drawing of my girlfriend Natalie. After seeing the wacky doodle above that accidentally resembles her, she wanted me to actually draw her and more importantly, to "Do it crazy!". I gladly accepted the task.
I came up with this idea using Microns and prismacolor markers. I was inspired by some very linear African artwork that I recently framed at my job. I could not determine the artist's name but he/she produced these beautiful images of African women and children all rendered with crosshatching and muted blocks of color. The color palette was extremely simple which emphasized the beautifully constructed and painstakingly clean crosshatching.
I have experimented with a similar process to this about ten years ago when I was graduating high school. I remembering learning about crosshatching and pointillism to which both techniques became my favorite over the next couple years. Come to think about it, it was around the same time my mother bought me the 48 set of Prismacolor Markers which is a little ironic. I would draw intricate shapes, crosshatch them, and fill in each box with a color. It originated from my love of chess. I emulated the game board in a lot of my drawings back then and I still use this repetition today.
I stepped my game up this time and recently purchase the 72 set of markers which I am "crazy" excited about and which is why I am pumping out art daily. New materials bring forth new ideas.. New ideas bring forth new opportunities.. New opportunities bring forth.. Ahh.. you get it.
Thursday, November 17, 2011
Bay Whatch
This piece was inspired by the Flemish mannerist style and the work of NJ artist Jay Adler. Mannerism encompasses a lot if different styles from the 15th century ranging from true realism to foreshadowed figures that look quite odd in certain positions. The flems contorted figures in an extreme way which broke away from the traditional realism of the times. They were innovators during a time when people were set in their ways especially in the arts. This is the type of of art I enjoy. Thought provoking wildness that breaks rules..
(Why am I not a graffiti artist?)
The artwork of Jay Adler is a great example of this. He is known in the art world as a surf artist. He paints images of surfers, beautiful waves, and scenery. This subject matter rarely diverts from this ideal, but a recent painting tells a different story. He continued to corrupt the Vitruvian Man's attributes by stylizing body parts like a funny caricature while entertaining the idea if love. His painting is of two figures; a man and a women. They are holding each other as their limbs stretch further and further around each other as if to get the strongest and tightest hold possible.. A bond.. Physical and chemical.
My creation is drawn in a very similar style but my subject is very different. I drew a basic outline and pushed the limits of each attribute to form an interesting fluid shape for each body part. I made the mistake of outlining my sketch with microns before I was completely satisfied with an idea which came back to bit me in the you know what. Near her nipples, you can see a harsh outline of a layer of hair I wanted to omit from the drawing but instead, I accidentally outlined. Unfortunately, color pencils could not hide this and I knew this before attempting to. I was positive that I didn't want this area accented and I just decided to leave it as is. I'm hoping to apply paint, oil markers, or an opaque medium to conceal these lines later but for now, and before I ruin it any further, I will leave it be.
A couple days later...
So I tried using a razor blade to shave off the areas with the unwanted marker and it lessened the blow a bit. I also used Sharpie poster paint markers to conceal the lines even more but the glossy texture created by the colored pencils negated much of this attempt. For what it is, I think it's hidden pretty well and it's not so much of an eye sore now, although it still bothers me.. A lot. Overall, it was a fun little project that distracted me from some mandate portion of my life so thanks Art.
Sunday, November 6, 2011
It's For the Birdz

20" kidrobot Mega Munny entitled, It's For the Birdz
I stared at this sculpture for a long while before I could actually cut, paint, design, or even touch him for that matter. He seemed extremely monumental compared to the small 7" munny which scared and excited me simultaneously. I decided to start at his base by cutting away areas of his stomach. My original 2-D design, located near the bottom of this post, called for a blunt opening with a painted surface much like wood paneling or veneer mouldings. As I started transferring my 2-D design to this 3-D sculpture, things began to change. I decided to make the positive space resemble a picked white fence to contradict the visual and emotional feel of an urban area. As I cut away areas, with an utility knife, I noticed that the upper portion of the chest took the form of a human rib cage which birthed my idea to make it all about the birds.
The bird cage lead me to believe that I would eventually put bars inside the opening and fill it with candy that people cannot get in honor of Halloween. At this point, I was going to title my work, " No Treats for Tricks!" Unfortunately this did not happen. I could not figure out a way to fabricate the bars strong enough to survive a UPS man's hands all the way to Texas, and I did not want to buy a bird cage just for the small elevating door.. boo. Oh well.. moving on.
The first pictures below were taken after my first session with the munny. I spent about seven hours completely dedicated and involved with thinking, cutting, and painting that I never documented each process. I adapted the bricks idea from my smaller munny mentioned above and I decided to make him an entire building in honor of the ten year anniversary of 911. RIP The bricks were painted using a one-point perspective to convey depth and the idea of a possible explosion or erosion. This hole would eventually be the perfect place for my bird's nest's candy dish!?


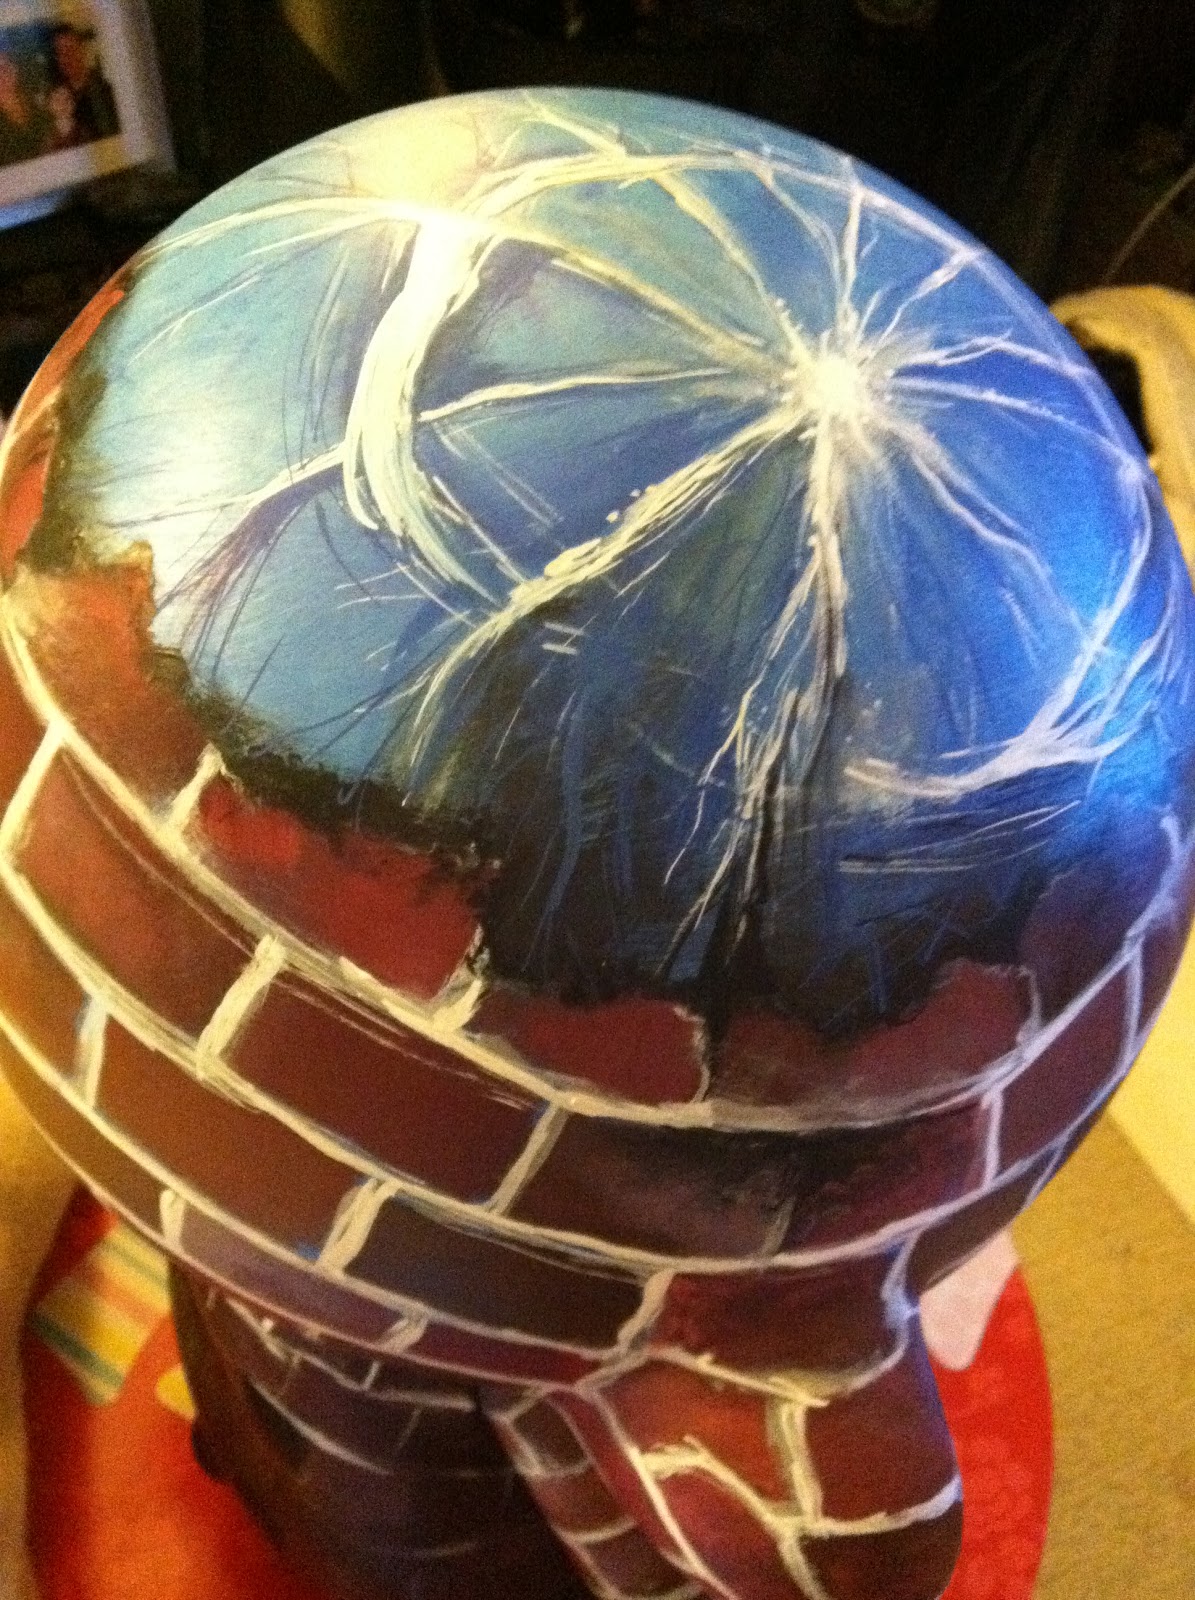
After painting all those bricks, I decided to compliment my building idea by painting the top of his head blue like a sky. After coming home from work the next day and staring at it, again; it began to look like an egg breaking through the top of the building. I liked this idea. I researched online and found a Photoshop image of a Windows-default desktop screen saver that an artist layered broken glass over. It looked awesome! Painting the cracks was difficult. It did not look anything like my intention.. broken glass or a damaged egg. I'll get back to that..
Rolling with the building idea, I decided to make physical windows in munny's back. I went to Michaels, knowing that Aaron Brothers does not sell Shrinky Dinks, to buy the some. I grabbed the only kind they had and continued shopping around the craft aisles to gather some ideas. I stumbled upon a small fake bird which would work out pretty nicely. It was a dollar or two so it couldn't hurt. I also found a small bird house, some twigs bound together like a nest, and a box of sculpey (<-- also a good time). Later that same day, my girl friend, our friend Shane, and I went to Bates Nut Farm to pumpkin pick. While searching for the most righteous pumpkin, I decided to nab some hay and use that for the nesting material within my munny. I asked the clerk to charge me a few dollars for some hay but she allowed me to take as much as I wanted which was nice. A nice pumpkin and a plastic bag full of hay ended the day.
 That night, I was super excited. I didn't know whether to build a nest or make a window. I did both. I got started on the the Shrinky Dinks first. It turns out that "Bright White" is opaque and not ideal for a window. It did not occur to me at the time, but the name now said it all. My girlfriend and I still had fun experiencing the material although we did not use it properly. Don't try this at home kids but we used a heat gun to shrink the plastic instead of a toaster or oven. Its way faster and doable anywhere. The downsides are it blows around, you'll need a suitable surface that can withstand heat, and you'll need tough fingers.. She made rings while I made a small munny I traced from the 7" Munny Comic-book. Frustrated, I called around looking for the "Crystal Clear" but I could not find this product anywhere. I had to order online and wait :(
Now that my project had a subject and an inhabitant, my ideas started taking over. I needed a drill. My boss was cool enough to let me borrow some materials from work. He lent me a heat gun, embossing powders, alcohol inks, a small piece of acrylic, and chalk inks, almost all of which I am unfamiliar. Oh, and a cordless drill. I planned on drilling a large hole, on the top of his head, to create a Rose Window, a traditional circular window found in Gothic churches, out of a broken scrap pieces of acrylic. I planned on using the alcohol inks to create colorful stained glass while using the embossing powder to mimic the lead used around each pane of glass. It was going to be a lot of work. I thought that buying a drill bit while not even owning a drill was a little much.. and pricey too. I returned the drill to work the next day and went to Home Depot to investigate...
 ... And that's that. I scurried home excited to drill everything! The bird house was sitting next to munny as I walked in with the drill and it spoke. I am very glad it did too. Munny's head is unlike the rest of his body and unlike that of the smaller versions. I drilled and drilled and drilled but nothing was happening. It was beginning to second guess the drill. The bit had piecered through his vinyl exoskeleton but would not penetrate his insides. Foam.. I could not drill any further because the foam would not compact. I was so disappointed but very happy I did not drill the enormous hole I planned on the top of his head. I bored out the hole and smoothed it out with my fingers until I unexpectedly broke through into a hollow pocket in the middle of his head. It worked out.
I headed back to Home Depot to buy a 1/4 wooden dowel needed to build the birdhouse perch you see on the bottom right photo. I left the dowel nice and long so it would pierce through the foam on the other side of munny's head and rest comfortably inside, adding to it's support. I eventually painted bricks inside the hole, on the foam, but it looked bad. The foam made the paint look as if it were done improperly so I sprayed some silver spray paint inside his dome to dust the entire inside.


After I had shrunken my windows, I used the heat gun to soften the vinyl. Cutting into a warm munny is like cutting into butter and it made the process a lot easier than the cutting of his chest. After I had all six windows cut, I painted each from a viewer's perspective. The painted bricks, in the jams within the middle windows, create straight lines while the lines within the windows on either side conform to fake angles to create more depth. After painting each accordingly, I adhered them to munny using a hot glue gun. The windows in his back were not too much trouble. I just made the window a little larger than the hole, like a rabbit to a frame, and painted over the excess from the inside.


 Tags. Munny took the shape of a plain and boring building uninterrupted by the rattles of skilled craftsmen. I am no graffiti artist but I really do appreciate the art form. It is amazing what some people can do with a spray can and a set of caps. I never tagged illegally but I did have a very large window in my backyard that my buddy Steve and I used to hit up. I enjoy spray painting but it's just so messy. This was a relatively clean water-based expression. I develpoed small tags and characters to enhance my idea of an urban building. I wrote things like, "Adult Human" to poke fun on kidrobot . Other words: R.Senal, Sick, Tweet, Graphiti, Memo, etc. I started running out of ideas and transplanted older drawings and art I have completed in the past such as my self portrait pumpkin carving, stick figure guy, etc. It was a cool
 'drawing' down memory lane.
 I used a product that I was unfamiliar with which is always fun, frustrating, and most of all "out of the box.". The tags and graf art were all created by chalk inks. They are non-toxic, food safe, and most importantly acid-free felt tip marker that produce super vibrant colors to attract the eyes. The pigment seems to jump off of any surface you put them.. and they go on anything! This is why places like Starbucks or Trader Joe's use these markers for their signage. They are very similar to poster markers since they are water-based and can be used on a variety of non-porous surfaces such as glass, plastic, or metal. In the back of my mind, I was very weary of what would happen to this medium during the varnishing process but I chugged along and pretended to forget about it.

'Outfected'
Right before I varnished, I gave munny earrings like I did for the 7" munny. This time I used scrap wooden dowels spray painted silver and sculpey to form a gauged hole in his ear. I guess munny needs attention too.
After using the white chalk ink marker to touch up the mourter between the bricks, I varnished the entire project in matte acrylic spray; minus the bird n hay. I also taped off the body and head to gloss the blue area (cracked egg/cracked sky/cracked glass.. "lightning"<--fighting word)
Munny Goes Electric?


All in all, it took about thirty-five hours, $100.00 in materials, and a lot of hard work. If I was working on it or not, I was still thinking about it no matter where I was, what I was doing, or who I was with. I used a ton of materials and needed particular equipment to achieve my result. Here is a list of such items.
Tools: Heat gun, drill, utility knife, glue gun, and paintbrushes. Materials: Chalk ink, alcohol inks, alcohol solution, acrylic paint, irridescent medium, sculpey, matte and gloss acrylic varnish, silver spray paint, hay, light bulb, wire, glue sticks, Shrinky Dinks, Copic Markers, wooden dowel, and miniature bird.
I really did have a wonderful time with this guy and I'm extremely sad to see him go. I just hope whoever wins him takes good care of him, Thanks for reading this monumental entry. This post took nearing as long as the sculpture did to complete. I'm tired.

Tuesday, September 27, 2011
Handmade with Love

8" x 10" Mixed Media on White Drawing Paper
I think we should simplify this idea by writing out the word "Handmade" with a detail brush. It's clean and clear and under control..
Wednesday, September 21, 2011
The Race

So here is the story. My mailbox is approximitly 300 yards from where I saw him. I walked back and forth within the time it took him to create this one inch slim mark. Granted, i do walk pretty fast but being that slow really has to suck the big one.
Note to self.. 'If reincarnation does exist, opt out of snail'
Lemmi Winks brother Fezzi Winks

8" x 10" Colored Pencil on 80lbs White Drawing Paper
 A funky collaboration with Natalie. After a couple successful hand-offs of the sketchbook, this drawing started to resemble a gerbil. Lemmi Wink's cousin was born.
I'm not sure if it is done or not. I have to ask Nat but either way I had fun and I'm glad Natalie was there to create this with me :)
Call of Duty MW2 911 Playercard Art

Ps3: Call of Duty MW2 Player Card, September 2011
We will never forget
Picassoed Picasso
Well I cannot rearrange photos on this mobile blogger app so For now I will just post and I'll worry about format another day. At least I can get some art out into the world and hopefully influence someone on the Internet machine.
This small 5" x 7" pen and ink drawing is a cubist representation of Pablo Picasso. Picasso and Georges Braque were the inventors and originators of the cubism movement. Picasso, more so than Braque, is the staple to cubism and has inspired me and millions of other artists over the past century. My favorite artist Marcel Duchamp, a cubo-futurist known for the fourth dimension of art and, in my opinion, the most important piece to art, the power of titles and the ability to explain art, is included.
Anyway, this drawing was completed in three sessions. The first two photos are micons in black only. I began adding sepia microns and a white and a black prismacolor pencil near the final phase if the drawing; adding an aged look to the portrait.. Or whatever you would call it. Although it is not cubist by definition, it is still abstract enough to be considered as such. And again, I will eventually revamp and reorganize these mobile posts to be congruent with past entries. As always, thanks for checking in.
Itty Bitty Natalie
Hello folks,
It's been a little while. I'm in the process of moving and I packed my computer almost a month too early. This is why I haven't posted anything. But good news! I just downloaded the blogger app for my iPhone so I can blog on the go. I haven't explored the app so I'm not sure about providing links to references, other images, etc. I basically just want to see how this goes before I get into all that. I hope I can move images around and use my typical blog set up to keep it uniform. Let's see..
This is a tiny portrait I did of my girlfriend. I fell in love with Natalie's FB profile picture and I wanted to paint it. I had an extra baby canvas from my AB Munny project so I went for it and was very happy with the result. I will post the original image when I get my computer up and running again. Thanks for reading!
Wednesday, August 10, 2011
Munny For AB 83 (Lost in the Ozone)
Mixed Media on 7" kidrobot Munny
This was probably the coolest hing I got to do at work so far. My boss gave me the task of designing a Munny for our new sale coming up in September. The "Artrageous Sale" is deeply rooted in graffiti and urban style art. All of our signs and window clings are graffiti and we now sell Montana Gold spray paint and several of these sculptures. There are several designs but all are soft vinyl toys made by kidrobot that artists can paint, draw, do whatever to. It's a design-it-yourself art project. You can check out more Munnys.. Munnies here and also here.
I started this project with Sharpies markers, drawing what cities lack the most.. trees. The trees, without leaves, eventually turned into vines and roots which represented growing up. Although it looked cool, this black and white version was not what I wanted. I guess I was on autopilot and ended up wasting a couple hours because I painted over most of it the next night. I wanted something that embodied the urban life I remember seeing back east. It needed brick walls and graffiti... An old feel reminiscent of NYC in the 80's where graffiti began.

To get into the feel of urban art and graffiti, I decided to watch Paid in Full. Its a movie depicted in the 1980's about a few drug dealing friends that grew up in the rough area of Harlem and deal with the problems and casualties of living such a lifestyle. The movie gave me some inspiration to start painting.. RED!! The acrylics I used are not artist quality but this worked to my advantage. A single coat of this cheap paint acted like a transparency and allowed the marker detail to shine through. They are not as opaque as the heavy body Liquitex which I normal use. This allowed me to keep the roots on his right leg which is the only portion of the original design that I liked.
 That movie reminded me of the only time I was in Harlem walking around and it was pretty scary. Granted I was there to see a Jousha Johnston painting in a YMCA during the middle of the day, with two super awesome white lesbian women in their 40's. It sounds like a dream but I swear it's true. I was taking an African Art History class at Kean University at the time and the trip was required. I remember coming out of the subway with my classmate Maria and her girlfriend and being instantly overwhelmed. We asked the first person we saw for directions to the YMCA and the Harlem Museum. Although I didn't trust the person we asked, he was right on the money which made me feel terrible. Sorry guy with one tooth more than a baby.
  After the gun busts and ganstas in the movie, I drew the target on his back and painted The United States on his head to represent other countries'
I expected this digital piece to have a transparent background and I did not know that JPEG files automatically insert a white background when saving. I had to go back in the cheap way and magic wand everything that reappeared. It looks pretty terrible compared to the original Photoshop image that I saved because the areas that were transparent are now opaque.. (obviously) Oh well. I wasn't going to waste anymore time on this. If I only saved it as a PNG file instead of a JPEG, I would have been able to keep the transparent background.. Who knew?
Fun facts: The term "zoned" or "zoned out" derived from a 1970's phrase "Lost in the Ozone" which I found to be quite appropriate for this blog posting. There is my title.. Boo-ya!
*FYI The Aaron Brothers in Midway, CA is having five world renown writers tag their windows live on August 13th from 1PM-5PM. This promotional event is free and will benefit the Boys and Girls Clubs. CLICK HERE for more info. Do it, Do it, do it..
Subscribe to:
Comments (Atom)
DLyonsArt@gmail.com

- The Art of Daniel Lyons
- ART ART ART ART ART ART ART ART ART ART ART ART ART ART ART... ART!!! SHHH!!! (aaaaarrrt)
Featured Sites
-
“There Were Three Men Dancing On The Moon” - There were three mendancing on the moon Spacesuits tethered them and saved their facesThey pushed off the surface and were able to flip, twist, and spin an...4 days ago
-
-
Superhero Sketches - Here are a couple of light hearted sketches of the Hulk and Batman from last week. I'm working on some chalkboard style quotes at work and learning a l...
 10 years ago
 -
-
-
Communication. - Why, heeeeelllllo there. I'm feeling a bit silly tonight! Maybe it's due to all the blustery wind outside, or maybe it's because Rachel, of Rachel Pfeffer ...
 14 years ago
 -
-


You are Now a Red Blip
Thanks for Stopping By
